|
Recent Entries to this Blog
Windchimes-Love or Hate
Posted: 31 Mar 2011 Posted: 31 Mar 2011 Posted: 21 Feb 2010 Posted: 28 Nov 2009 Posted: 10 Feb 2009 All Entries |
Making A Mosaic birdbath
Well the hubby has talked from time to time about making a mosaic birdbath. First he had to find a shallow one piece low birdbath. Birds really like shallow water. He finally found one he liked and brought it home. I asked him if he had any preconceived ideas for design or color and he said "no." Hooray- now it can be just what I want. First we drag it around to several places it might look good. We decide to nestle it in some mini- varigated bamboo that I have trimmed like a hedge. Now I am ready for design and color. I decide on a kind of Mer-Lady. I want something that doesn't fade into the background because I have a lot going on here. So I draw her and here she is. You can see where I have made corrections on the original. 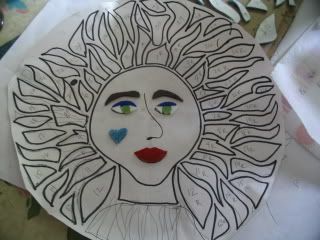
Before hubby goes out the door he says if I have the pattern cut out when he gets back he will be happy to start cutting glass. You don't have to tell me twice so I get busy. I need three copies of the pattern. One will be cut out and glued with rubber cement to the glass that will be cut with a glass cutter. They will be cut and ground with the paper on them. One copy is a map that you will need to lay the cut pieces on and the third I will use to put the design on the birdbath and put in my files. Since the birdbath is concave I will cut the pattern in pieces to get it to lay flat in the birbath. Now hubby has cut the glass that is cut out and given it to me. I take the paper off every piece and clean and dry it with windex and lay it on the map. 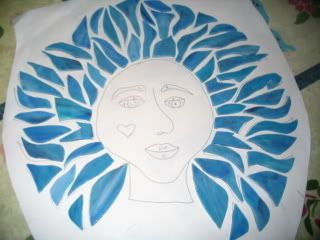
Now I will take the hair and snap each piece into 4 or 5 and lay it back on the map. This is done because I want the hair to look like long pieces but it has to conform to the curvature of the birdbath. This takes some time and when I am half done I decide I better start glueing it. If someone knocks this glass off this paper I will be in big trouble. 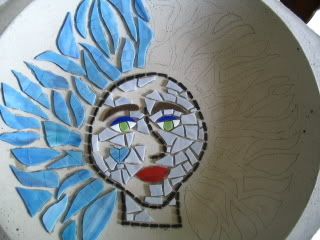
Now I am using my 100% silicone glue. This makes a great waterproof bond. I know how good because now that I decide on red for the outline I change the heart on her face to red and have a time prying up the blue heart. Then I am finished with the glue. I get my razor knife and trim all excess glue from the edge. Now the piece sits for a full 48 hours to cure. We decide on a pale gray grout to match her face. We could go with black. That would give her kind of a broken puppet look that would be interesting also. Hubby does his usual great job of grouting. It sits for 24 hours now and then I clean it with a ceramic tool and some little wire brushes. It's ready. 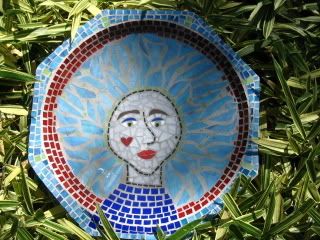
She nestles right into this bed as if she were made for it! 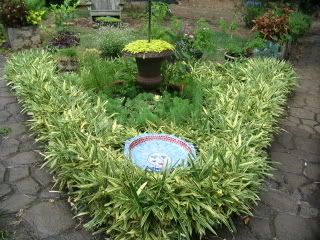
This blog entry has been viewed 7687 times
You're reading one of many blogs on GardenStew.com.
Register for free and start your own blog today.
You make it look so simple Bethie but I'm sure if I tried it it wouldn't look half as good as yours!! It DOES fit into the bed as though it were made for it. Beautiful!!!
Wow !!! you two are such a team.Wonderful birdbath and wonderful art.I do love is Bethie.
Need I say...WOW?
Bethie, she's stunning! I love mosaics! I really love that you showed the whole process, including the planning.
Another amazing piece Bethie.
Another beautiful work of art Bethie and hubby. I love it.
Yep, Wow is the word!
How did I miss this? That's great work Bethie ;)
Oh my goodness! This just blows me away. I can't wait to see what else you have created.
Wow! you sure get the thought processes churning! can't wait to get started and can't wait to see more of what you've made. Login or register to leave a comment. |
Archives
All Entries |

